AARP Hearing Center
- AARP Online Community
- Games
- Games Talk
- Games Tips
- Leave a Game Tip
- Ask for a Game Tip
- AARP Rewards
- AARP Rewards Connect
- Earn Activities
- Redemption
- AARP Rewards Tips
- Ask for a Rewards Tip
- Leave a Rewards Tip
- Help
- Membership
- Benefits & Discounts
- General Help
- Caregiving
- Caregiving
- Grief & Loss
- Caregiving Tips
- Ask for a Caregiving Tip
- Leave a Caregiving Tip
- Entertainment Forums
- Rock N' Roll
- Leisure & Lifestyle
- Health Forums
- Brain Health
- Healthy Living
- Medicare & Insurance
- Health Tips
- Ask for a Health Tip
- Leave a Health Tip
- Home & Family Forums
- Friends & Family
- Introduce Yourself
- Our Front Porch
- Money Forums
- Budget & Savings
- Scams & Fraud
- Retirement Forum
- Retirement
- Social Security
- Technology Forums
- Computer Questions & Tips
- Travel Forums
- Destinations
- Work & Jobs
- Work & Jobs
- AARP Online Community
- Games Tips
- Leave a Game Tip
- Maximize your score in Jewel Shuffle
Games Tips
- Subscribe to RSS Feed
- Mark Topic as New
- Mark Topic as Read
- Float this Topic for Current User
- Bookmark
- Subscribe
- Printer Friendly Page
- Mark as New
- Bookmark
- Subscribe
- Mute
- Subscribe to RSS Feed
- Permalink
- Report
Maximize your score in Jewel Shuffle
Looking to maximize your score in Jewel Shuffle? Give these tips a try!
- Match your jewels on the lower rows when possible. Since new jewels drop from above, the longer the jewels “travel” from top to bottom, the higher your chances are of getting auto-matches and earning free points.
- Use the magnifying glass Help button if you are not sure you’re making a good move. Clicking on the Help button several times displays all possible moves it does not have any score penalties.
- Bonus glowing jewels and Brilliant Jewels can be game-changers. The best strategy is to save them until you are running out of moves and then match them to clear more space. This will automatically create new move opportunities.
- Tags:
- jewel shuffle
- Labels:
-
Strategy
- Mark as New
- Bookmark
- Subscribe
- Mute
- Subscribe to RSS Feed
- Permalink
- Report
I love this game, it trains our brain to a much greater extent,
than it initially seems.
If you want to 'fight' the game for the best possible result,
here are my observations and conclusions.
The most basic - the goal is not to make a move that
gives maximum points, your primary goal is to complete the current
level and keep playing. This means that you should always strive for
to have at least 3 spinning diamonds (your second life).
(1) look carefully at the entire board, don't make the first move you've spotted
(2) actively look for opportunities to create diamonds unless you have 3 or more
(they form spontaneously very rarely, you have to help in creating them)
(3) only use diamonds when there is no other move possible
(unless the only possible move makes the explosive piece threatening
your diamonds)
(4) if not (2), always make the possible move closest to the top
(matching jewels at the bottom first possibly destroys a match above)
(5) if you have 2+ diamonds, never create explosive jewels, they are a threat
for your diamonds (kill your extra life)
(6) If you have a diamond(s) and 'explosive' fire the second as soon as possible
if only this will not trigger a diamond
(7) if you have 2 different moves in the same area, make first the one which
won't destroy the other one
(8) vertical match usually gives slightly better chance to create next match than
horizontal
(9) train your brain to predict the distribution of jewels after making a move,
after a few weeks it's not too difficult
- Mark as New
- Bookmark
- Subscribe
- Mute
- Subscribe to RSS Feed
- Permalink
- Report
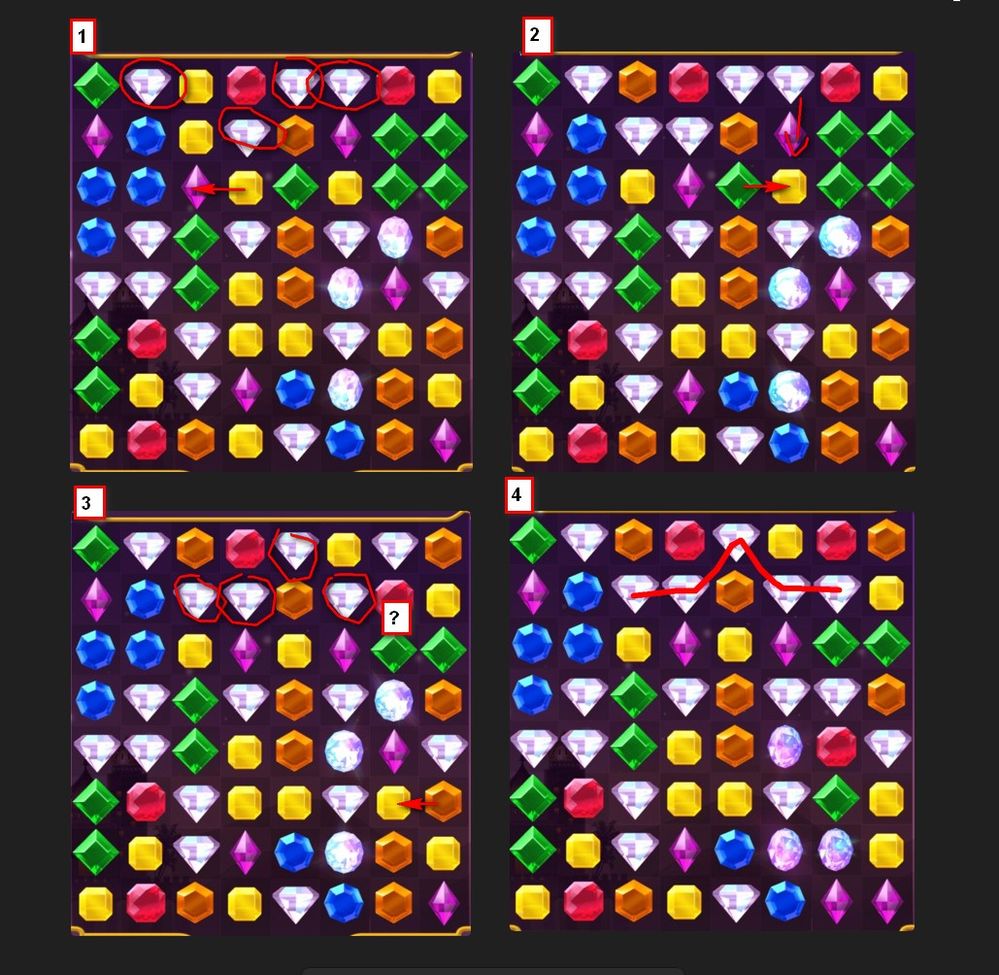
An example of actively creating a diamond.
Board nr. 1
planty of possible moves but after short analize I see I have already
4 white gems (in red circle) on right positions to create a diamond, if
I move the yelow guy might be the missing white appears where I need it.
Board nr. 2
Bad luck, the white gem dropped down just one row below, but it's still
a chance, moving the green to the right makes top white to drop one row
down and I still have four whites in a possible diamond creation arragement
(as on board nr.3)
Board nr. 3
the way to deliver missing white gem at the top right corner is to move
the brown (bottom right corner) as marked by the arrow
Board nr. 4
Good luck this time, all 5 white jewels are on correct positions to create
a diamond in the very next move
- Mark as New
- Bookmark
- Subscribe
- Mute
- Subscribe to RSS Feed
- Permalink
- Report
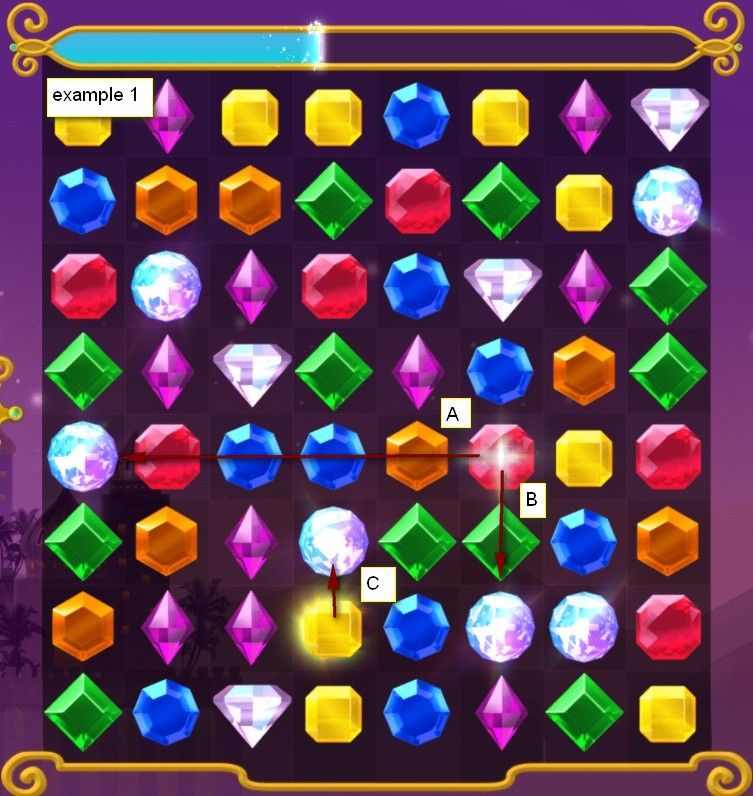
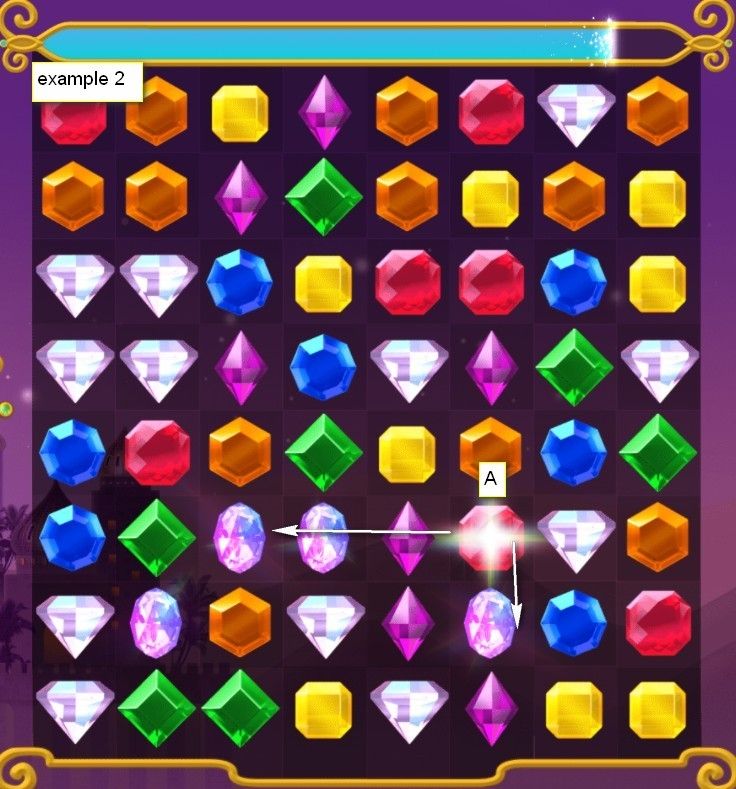
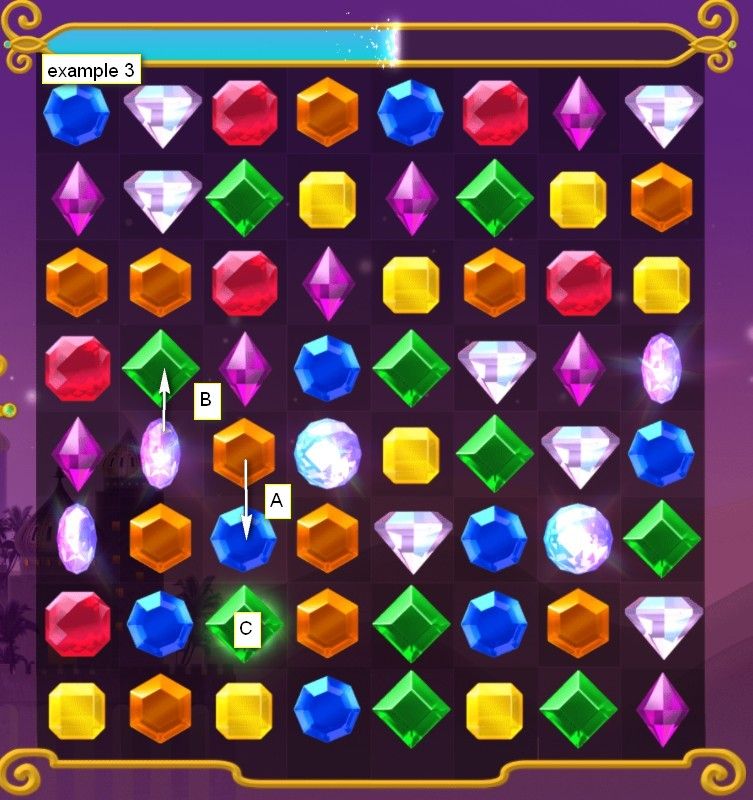
two examples why you should never create explosive gems intentionally, when
you already have diamonds
example 1.
the red lightning, if triggered, kills two diamonds (A & B)
the yellow 'bomb' kills one (C)
example 2.
the red kills three diamonds in best case scenario
Hard decision
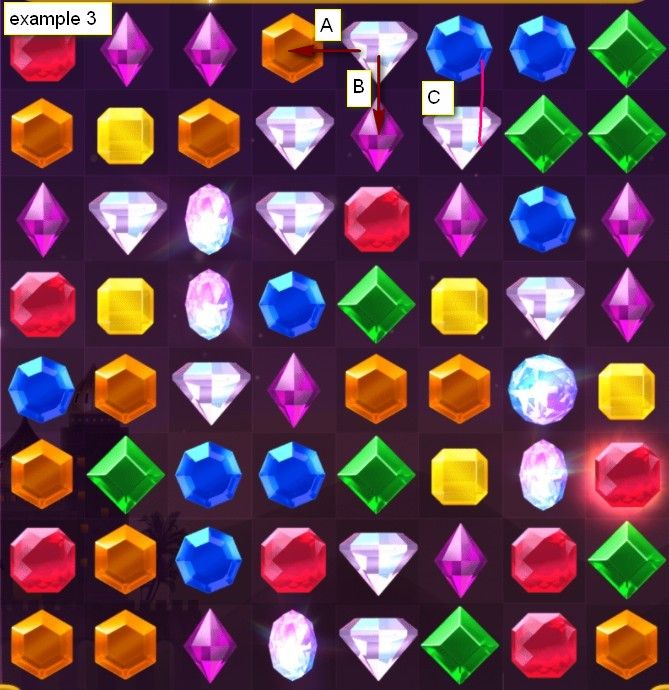
example 3
on this board the only move (the only I can see) is A but the move
transfers two diamonds to impact zone of green explosive C, I decided
to point my diamond to green gems
(move B, which destroys all green gems on the board, including the 'bomb')
to save one diamond;
HAVE FUN playing jewels 🙂
- Mark as New
- Bookmark
- Subscribe
- Mute
- Subscribe to RSS Feed
- Permalink
- Report
Of course I'm not a theoretical guru of this game and I make mistakes
as all of us, you can safetly suspect there are mistakes in my reasoning 🙂
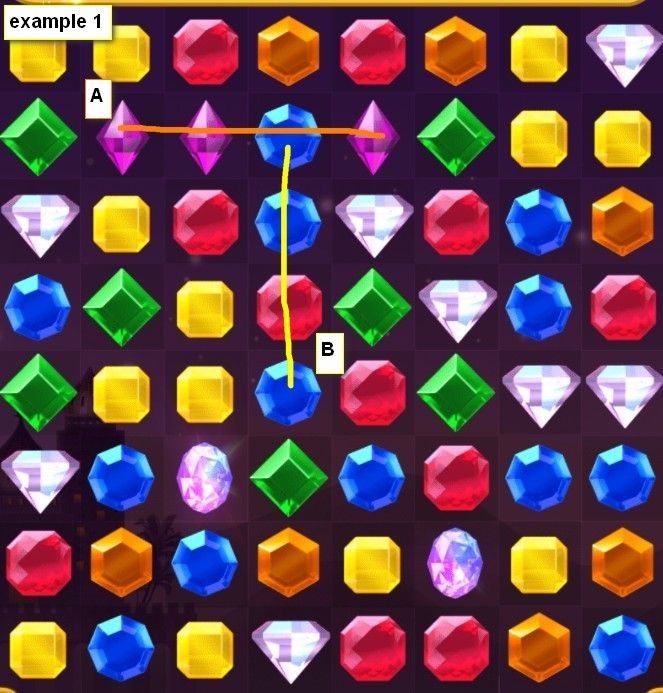
Few examples when you have to decide what move to do first:
example 1.
If you match the pink jewels (A line) you will destroy the
blue match (line B), so the correct sequence is B first, then A
example 2.
you can move the blue gem to left (A), or right (B), the first option
creates additional match of blue's (C)
example 3
you can move the white gem either left (A) or down (B), the second option (B)
moves the blue gem one row down and creates additional match (blue gems)
----------------------------------
- Mark as New
- Bookmark
- Subscribe
- Mute
- Subscribe to RSS Feed
- Permalink
- Report
- Mark as New
- Bookmark
- Subscribe
- Mute
- Subscribe to RSS Feed
- Permalink
- Report
@ClaireM542738, can you please share how you get such a high score? What is your strategy?
"I downloaded AARP Perks to assist in staying connected and never missing out on a discount!" -LeeshaD341679


